Hoe uw iPhone-, Foto's- & iCloud-account te beschermen

In de VS vormen iPhone-gebruikers nu ongeveer 45% van alle smartphonegebruikers (vanaf januari 2020) en bijna een miljard gebruikers slaan gegevens op met Apple's iCloud. Met zo'n enorme hoeveelheid beschikbare persoonlijke gegevens zijn hackpogingen hardnekkig, verfijnd en willekeurig .
Dit artikel is gemaakt om u te helpen uw Apple-apparaten en -gegevens te beschermen tegen hackers. We hebben de meest effectieve methoden uiteengezet om uw apparaten en gegevens veilig te houden, beginnend met de essentie en overgaand op meer betrokken veiligheidsmaatregelen.
Since 2017, Apple have allowed "differential privacy" on iCloud user data. This function allows users to enable or disable data-sharing for analytical purposes. The same iOS 10.3 update also included numerous notifications promoting two-factor authentication (2FA) adoption. Both actions work to keep your iPhone data safer.
Hoe kan ik mijn gegevens beschermen?
Jennifer Lawrence, Kirsten Dunst and Kate Upton were among the victims of the notorious Celebgate hacking attacks, which accessed data from iCloud accounts remotely and without permission. Celebrity hacks show these breaches can happen to anyone, Apple already implements numerous safety and privacy protections as defaults (such as 2FA) to make sure your iOS devices and iCloud data is kept safe. Successful hacking attacks are almost always the result of users failing to implement Apple’s security tools properly or phishing.
You can use this article to ensure you’re making the most of Apple’s security features. First, we cover the 12 most important steps to protecting your data which we recommend every iCloud user follows. Once we've covered the essentials, we outline a further five safety measures which are slightly more advanced or involved. You may want to consider implementing these steps if you are at particular risk of being hacked, or if your data is particularly sensitive:
12 Easy safety measures everyone should always take to protect their iPhone, Photos, & iCloud data🔒
Laten we beginnen met de basis ...
1. Beware of phishing attempts
Phishing-berichten zijn nepreplica's van legitieme beveiligingsmaatregelen. Het zijn e-mails, sms-berichten en oproepen die u ontvangt van Apple, Google of andere vertrouwde bedrijven, en die meestal dringende of tijdgevoelige berichten bevatten, zoals: "KLIK NU om ervoor te zorgen dat uw account actief blijft!" Omdat deze e-mails, berichten en oproepen zijn ontworpen om toegang te krijgen tot persoonlijke informatie, vragen ze vaak om gebruikersgegevens. Dit zijn allemaal onzin - en gevaarlijk om op te klikken.
Pas op voor onverwachte e-mails, berichten of telefoontjes waarin u om persoonlijke gegevens wordt gevraagd. Zo'n e-mail zou iets kunnen zeggen als: "We hebben onlangs verdachte activiteit in uw iCloud-account gedetecteerd. Gebruik dit formulier om uw wachtwoord opnieuw in te stellen."
Whenever you see an email asking for credentials, check the URL. If you see any domain other than iCloud.com, or if you notice an insecure certificate when browsing, it's most likely a phishing attempt. Here's Apple's icloud.com, and the secure certificate that you should see on it:

Berichten en oproepen die beweren van Apple te zijn, zijn zeer onwaarschijnlijk authentiek, omdat Apple veel waarschijnlijker contact met u opneemt door een melding rechtstreeks naar uw iOS-apparaat te verzenden.
We recommend you always access your iCloud account manually, by opening in a new tab in your web browser and typing in "icloud.com", even if you think a message may be authentic. Always use the official iCloud site to log in, change a password, or check up on warning messages. You can also get in touch with Apple’s security team to report any phishing attempts to them.
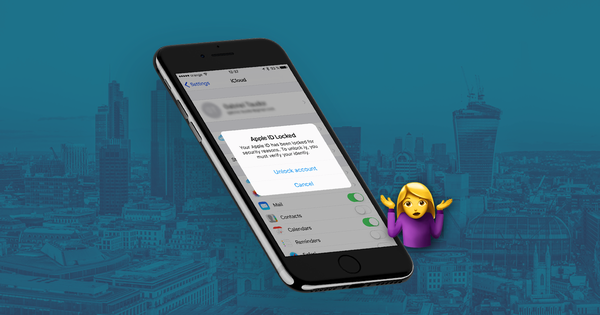
Heb je een bericht ontvangen waarover je je echt zorgen maakt? 😰 Raadpleeg onze gids over wat u moet doen als u mogelijk bent gehackt .
2. Keep your email address private
Zo nu en dan wordt een exploit ontdekt die uw gegevens kan compromitteren door eenvoudig op een link te klikken .
Mike Murray, een beveiligingsexpert van Lookout, beschreef de laatste exploit als "het meest geavanceerde spywarepakket dat we op de markt hebben gezien". Het was gekoppeld aan NSO Group, een Israëlisch bedrijf dat beveiligingstoepassingen maakt voor overheden. Een paar uur later lanceerde Apple een iOS-update, waarmee dit beveiligingslek werd opgelost.
Wat kunnen we hieruit halen? Hoewel het probleem snel werd opgelost, konden andere beveiligingslekken worden ontdekt. Het hebben van een privé-e-mailadres is een goede manier om op deze manier gerichte of willekeurige spyware-aanvallen te voorkomen. Hier zijn drie dingen die u kunt doen om privacy te waarborgen:
- Use a separate email address for purchases, social networks, and promotional messages, and a private, rarely disclosed one for any information you wish to keep secure. Share it only with trusted people.
- Vermijd het openen van berichten die op spam lijken, zelfs als ze voorbij uw filters zijn gekomen.
- Schakel tweefactorauthenticatie in voor uw e-mail (hieronder meer over 2FA) - overweeg uw mobiele telefoonnummer te gebruiken om meldingen over verdachte activiteiten te ontvangen.
- Versleutel uw e-mail - gebruik een webgebaseerde e-mailprovider of stel uw Outlook in om gecodeerde verbindingen met GPG te gebruiken .
Yahoo!'s 2013 email scandal, in which all 3 billion Yahoo! email accounts were hacked, revealed that email accounts are sometimes not as well protected as you might hope.
If one of your accounts becomes hacked, that weakens all linked accounts. If hackers gain access to your email account, they may try to send a password reset email to your email address using the iCloud login system.
Als u een iCloud-account hebt dat is gekoppeld aan een Yahoo! e-mailadres, is het het beste om uw wachtwoord zo snel mogelijk te wijzigen. Beter nog, wissel gewoon van e-mailprovider. Sorry, Yahoo! Gmail is robuust.
3. Update your iPhone passcode
Uw iPhone-toegangscode is de numerieke code die u moet gebruiken wanneer Face ID of Touch ID niet werken. Sinds iOS 9 is de standaardlengte voor deze code zes cijfers, wat aanzienlijk langer duurt om te kraken dan de vorige standaard van vier cijfers. Er zijn 9.999 mogelijke combinaties voor een 4-cijferige toegangscode, versus 999.999 combinaties voor een 6-cijferige toegangscode.
Om uw iPhone-bescherming verder te vergroten, kunt u letters gebruiken naast cijfers in uw toegangscode. Door een alfanumerieke code van meer dan acht letters en cijfers te gebruiken, kunt u er zeker van zijn dat de toegangscode niet kan worden gehackt of geraden - zolang u geen voor de hand liggende combinatie gebruikt.
Here's how to make your iPhone passcode longer and use an alphanumeric passcode:
-
Go to
Face ID & PasscodeorTouch ID & Passcode -
Enter your current passcode
-
Tap
Change Passcode, enter your passcode again, then selectPasscode Options -
Select
Custom Alphanumeric CodeorCustom Numeric Code -
Enter your new passcode twice to reset
Zorg ervoor dat u uw toegangscode onthoudt om verlies van uw gegevens te voorkomen! We raden aan om een alfanumerieke toegangscode van 8 tekens of meer te maken.

4. Use strong passwords across your accounts
Zorg er bij het gebruik van wachtwoorden en toegangscodes voor dat u veilige wachtwoorden gebruikt voor al uw accounts.
You also need to make sure to use different passwords across all accounts, particularly when it comes to those accounts with the most valuable data. Hackers often target less protected sites, and then try these passwords out on other accounts owned by the user.
At the very least, keep your iCloud password different from the passwords you use on less secure sites, and make sure it is sufficiently complex.
When choosing a new password, aim to meet the following three criteria:
-
Strong: Use a combination of lower and upper case letters, numbers, and special characters. Replace certain letters with numbers or symbols:
beardak0tast@arhip, for example. -
Long: the longer a password is, the greater the number of combinations a hacker needs to crack it. Consider using phrases to protect the integrity of your account, which are easy for you to remember as an individual but difficult for existing software to rapidly generate. Ideal passwords are at least 14 characters long.
Hard to guess: Avoid password terms that include personal information, like your birthday, pet's name, or a favourite colour, because they're easy for hackers to guess. Don’t choose a favourite band, your birthplace, or any other relatable guess as your iCloud password. The Telegraph has written on the most commonly used passwords; they're all worth avoiding!
Als u niet zeker weet hoe veilig uw wachtwoord is, zijn er een paar gratis online tools om u te helpen:
We don't recommend putting your actual password into either of them, though. Just put something in of similar complexity.
Vergeet niet het wachtwoord op een veilige plaats op te slaan nadat u een nieuw wachtwoord hebt gemaakt. Als u een uniek wachtwoord hebt voor elk van uw accounts, kan het moeilijk zijn om dit bij te houden, dus u kunt een wachtwoordbeheerder gebruiken om uw verschillende wachtwoorden samen te stellen en te openen.
Tools zoals 1Password (betaald) of KeePass (gratis) genereren willekeurige tekst die over het algemeen zeer sterke wachtwoorden maakt en u helpt uw wachtwoorden en vertrouwelijke gegevens veilig op te slaan.

Back in 2016, Colin Powell and George W. Bush lost their email data after their accounts was illegally accessed by a hacker. The hacker managed to gain access by guessing the answers to their security questions. Beware!
Many common security questions ask for information that could be public knowledge. For example, many security questions ask for your mother's maiden name. This information is not exclusively known by you and could be accessed by a hacker.
Gebruik moeilijkere vragen en antwoorden voor uw beveiligingsvragen om uw account veilig te houden. Kies een alternatieve vraag, zoals: "Wat is je favoriete film?" Of "Wie is je favoriete auteur?". Verzin in het ideale geval de antwoorden en noteer uw verzonnen antwoorden in een veilige wachtwoordbeheerder. Door moeilijkere beveiligingsvragen te gebruiken, maakt u een betere kans om uw gegevens te beveiligen.
5. Activate two-factor authentication (2FA)
Tweefactorauthenticatie is een verificatieproces voor de accounteigenaar dat wordt geactiveerd wanneer een nieuwe aanmelding wordt geprobeerd. Apple introduceerde 2FA in 2016 en sindsdien bieden we bij Reincubate ondersteuning voor deze functie.
2FA protects the iCloud account even where the password is known to somebody else. As long as a potential hacker doesn’t have access to any of your trusted devices, your iCloud account remains inaccessible.
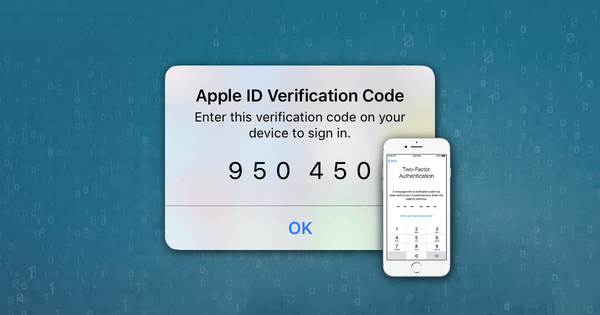
Tweefactorauthenticatie werkt als volgt: wanneer u probeert in te loggen op uw iCloud-account, ontvangt u een unieke code. Om het inlogproces te voltooien, moet u zowel uw wachtwoord als de code ontvangen op uw telefoon invoeren. Zonder de code (willekeurig in realtime gegenereerd) kan iedereen die toegang tot het account wil krijgen er niet in - zelfs niet als hij uw gebruikersnaam en wachtwoord heeft. Dus, hackers worden buitengesloten en je krijgt een pop-up of een sms-bericht dat je waarschuwt of en wanneer ze proberen binnen te komen.
Dit is wat u zou zien op een Apple-apparaat met 2FA ingeschakeld wanneer een login vanaf een nieuwe locatie wordt geprobeerd:

2FA is standard for all new Apple devices. If you use an Apple device that doesn't use 2FA as a default, here's how to can enable two-factor authentication for iCloud:
On your iPhone, iPad, or iPod touch with iOS 9 or later:
-
Go to
Settings -
Click on your name to access
Apple ID -
Tap
Password & Security -
Tap
Turn on Two-Factor Authentication
We behandelen tweefactorauthenticatie en de geschiedenis ervan in meer detail in onze gids hier .
6. Don’t use unsecured wireless networks (and use a VPN)
Gratis hotspots kunnen een handige manier zijn om op internet te surfen, vooral als u onderweg bent. Maar ze zijn niet veilig.
Degene die een netwerk beheert, kan verkeer dat daarover wordt verzonden onderscheppen of opnemen. Als u niet weet wie het netwerk beheert - en u vertrouwt hen niet - zou u het niet moeten gebruiken. Er is ook het potentieel dat andere gebruikers van onbeveiligde netwerken uw apparaat kunnen aanvallen en uw verkeer of gegevens kunnen onderscheppen.
The safest thing you can do is to avoid accessing the internet using these hotspots. Secured public Wi-Fi connections are safer, but you are still exposed to risks if you use them to access the cloud.
Use a good data plan with your carrier instead, and make sure your home WiFi network is secured.
If you do need Wi-Fi access on the go, invest in a Mi-Fi device, or consider using a VPN to protect your traffic. Bear in mind that using a VPN won't protect your device from other users on the network.
7. Use "Find My" to secure lost or stolen devices
Once activated, this option allows you to get in touch with your lost or stolen iPhone, or to remotely erase it. We’ve covered this in-depth here. You can essentially wipe the data on your iPhone until you recover it.
To wipe your data using "Find My":
-
Go to the
Find Myapp on a linked device -
Under
Devices, select the device that is lost or stolen. -
Select
ActivateunderMark As Lostfor that device. -
You can add a contact number to be used by anyone who finds your device.
Another benefit of this feature is that it prevents anyone else from using your iPhone if it's stolen. It can't easily be reactivated, so it's worth a lot less to a potential thief. You can also erase the data from your device using from the Find my app.

8. Enable "Erase Data" on your device
This is one of the most simple methods to prevent your phone from being attacked. If this option is enabled and somebody tries to guess your passcode, your iPhone will wipe itself after 10 failed attempts. Don't worry: this isn't something you're likely to do by accident. There's a long timeout between failed attempts. It'd take a serious attempt to have someone erase your phone.
To activate this feature:
-
Go to
Settingson your iPhone -
Tap
Face ID & PasscodeorTouch ID & Passcode -
Activate the
Erase Dataoption

9. Use local iPhone backups instead of iCloud
If you do enable "Erase Data", you should also create regular backups. An iPhone backup won't protect your data, but it will ensure that you can access your data in the event of theft or loss. iCloud backups are convenient, but they're not end-to-end encrypted, meaning it's at least theoretically possible for them to be remotely accessed.
Regelmatige back-ups zijn zo belangrijk, er is zelfs een Wereldback-updag speciaal voor hen. Ondanks een groter bewustzijn, betere gewoonten en gemakkelijkere technologie, maken veel gebruikers nog steeds geen regelmatige back-ups.
We hebben geschreven een uitgebreide gids voor back-up van uw iPhone of iPad hier .
Als u de berichten ' iPhone back-up mislukt ' of ' iPhone geen back-up' krijgt, wordt er geen back-up van uw telefoon gemaakt, dus als u uw apparaat verliest, verliest u uw gegevens.
10. Sign out of iCloud on unused devices and browsers
Alle apparaten waarmee u iCloud gebruikt, zijn verbonden in uw iCloud-account. Apparaten die hier zijn geautoriseerd, hebben op laag niveau toegang tot uw iCloud-account en alle gegevens die erin staan. Hackers kunnen proberen toegang tot uw iCloud-gegevens te krijgen door extra apparaten aan uw iCloud-account toe te voegen.
To view and remove iCloud devices on your device:
-
Go to
Settings -
Click on your name to access
Apple ID -
Scroll down to view the devices connected in your iCloud account.
-
To remove a device, select it, then select
Remove from account -
If you find and remove any devices you do not recognise, change your iCloud password.
To view and remove iCloud devices from a browser:
-
Go to iCloud.com
-
Sign in, then go to
Settings -
Select
My Devices -
Remove any devices you don't recognise or no longer use.
-
If you find and remove any devices you do not recognise, change your iCloud password.
Nadat u een apparaat heeft verwijderd, kunt u "Find my" niet meer gebruiken om het te lokaliseren.

Naast het verwijderen van ongebruikte iCloud-apparaten, moet u zich ook afmelden bij uw iCloud-account wanneer u een gedeelde browser gebruikt.
If you logged in to iCloud on a computer that is not your own (such as a work computer or friend’s computer) and forgot to log out, you can log out remotely.
To sign out of iCloud remotely:
-
Go to iCloud.com and log in with your username and password.
-
Select
Account Settings -
Scroll to the bottom of the screen to find the link that says
Sign Out Of All Browsers -
Click it and you'll be signed out of all browsers on any device anywhere in the world where you are signed in to your iCloud account

11. Turn off access to sensitive data for apps that don’t need it
To keep your data private you can also restrict access to apps that don’t need it, for example, access to your contacts, calendar, photos, etc.
To restrict access for apps on your device:
-
Go to
Settings -
Select
Privacy -
Select one of the apps listed, such as
Photos
Hier kunt u de apps bekijken die momenteel toegang hebben tot deze gegevens. Schakel de schakelaar aan de rechterkant om toegang tot gegevens voor elke app te verwijderen.

12. Secure your lock screen
In tegenstelling tot wat vaak wordt gedacht, maken Touch ID en Face ID je iPhone niet volledig onaantastbaar. Kort nadat Apple FaceID lanceerde, creëerde cybersecuritybedrijf Bkav een bedrukt masker dat een iPhone X kan ontgrendelen .
Lockscreen-aanvallen via Touch ID, Face ID of uw iPhone-toegangscode zijn niet erg gebruikelijk, omdat ze vereisen dat de hacker direct fysiek contact heeft met uw telefoon, maar ze zijn de gemakkelijkste aanval en waarschijnlijk het meest succesvol als uw apparaat is niet correct geconfigureerd.
Om uw vergrendelscherm te beveiligen, verwijdert u de toegang tot functies en bedieningselementen wanneer de telefoon is vergrendeld. Als u toegang tot USB-accessoires toestaat wanneer uw telefoon is vergrendeld, kan een hacker uw telefoon eenvoudig op zijn computer aansluiten en uw gegevens downloaden. Evenzo, als ze toegang hebben tot Siri, kunnen ze toegang krijgen tot uw berichten.
De beste bescherming tegen fysieke aanvallen op uw iPhone is om toegang tot verschillende bedieningselementen en functies van het vergrendelscherm te verwijderen.
To deactivate access from the lock screen:
-
Go to
Settings -
Select
Face ID and PasscodeorTouch ID and Passcode -
Enter your iPhone passcode
-
Scroll down to the bottom of the screen and disable access to Control Centre

We've disabled access to all controls from the lock screen because that's the safest approach. At a minimum, we recommend you remove lock screen access to all of the following:
-
Today View
-
Notification Centre
-
Control Centre
-
Siri
-
Reply with Message
-
Home Control
-
USB Accessories
Nog vijf beveiligingsmaatregelen die u mogelijk wilt implementeren
Als u zich vooral zorgen maakt over de privacy en beveiliging van uw gegevens, kunt u de volgende vijf beveiligingsmaatregelen gebruiken om uw gegevens en apparaten verder te beschermen.
1. Turn off "Personalised Ads"
Ad tracking is used by advertising networks to target ads to you. If you limit this, it restricts tracking of ads across apps. Well, apart from when Google bypass it.
To limit ad tracking on your iOS device:
-
Go to
Settings -
Select
Privacy -
Scroll to the bottom of the screen and select
Advertising -
Toggle to turn off
Personalised Ads
U kunt ook de Reset Advertising Identifier om de geschiedenis te verwijderen van de gegevens die al zijn verzameld en gebruikt om u gerichte advertenties te sturen.
![]()
2. If you're a macOS user, consider pair-locking your iPhone
Pair-locking vereist een beetje technische kennis en is niet voor iedereen, dus we hebben het in een ander artikel meer gedetailleerd behandeld. Kortom, het voorkomt dat uw iPhone ooit gegevens uitwisselt met een andere computer.
3. Delete unwanted or sensitive content from Photo Stream or iCloud Photo library
Als u bijzonder vertrouwelijke inhoud in uw fotobibliotheek heeft, kan het zinvol zijn om deze helemaal niet op uw smartphone op te slaan. Als u een gevoelige afbeelding verwijdert, moet u deze ook verwijderen uit "Verwijderde items". Houd rekening met alle manieren waarop deze gegevens kunnen worden hersteld .
4. Decrease the time until the iPhone locks itself
iPhones worden zo nu en dan op straat weggegooid. Wanneer dat gebeurt, wordt de iPhone meestal ontgrendeld en heeft de dief toegang tot alles.
Om dit te voorkomen, gebruikt u een korter tijdsinterval voor automatische iPhone-vergrendeling. Om het aantal seconden te verminderen totdat het telefoonvergrendelscherm wordt geactiveerd, moet u de instellingen van de Auto-Lock-timer wijzigen.
To decrease your phone's lock time:
-
Go to
Settings -
Scroll down and select
Display & Brightness -
Select
Auto-Lockand adjust the time available until the iPhone is locked.
The shortest interval of time is 30 seconds. Activate this option and confirm the action.

5. Encrypt your locally saved data
Als u gevoelige gegevens op uw computer hebt, kunt u deze het beste coderen. Windows heeft BitLocker ingebouwd en Macs hebben FileVault . Beide zijn geweldig - en gratis te gebruiken. Schakel ze in.
Als uw computer wordt gestolen en deze een gecodeerde schijf heeft, kunt u een verzekeringsclaim indienen en deze vergeten, ervan uitgaande dat u een sterk wachtwoord hebt. Het is leuk om je geen zorgen te maken dat iemand toegang heeft tot je gegevens. Riskeer het niet!
Gevolgtrekking
We hebben de belangrijkste beveiligingsfuncties behandeld om ongeautoriseerde iPhone- of iCloud-toegang te beperken. Terwijl nieuwe tools door hackers en forensische bedrijven worden ontwikkeld, nemen de risico's toe, waardoor beveiliging een voortdurende strijd wordt.
As a company, data privacy and security are in our DNA. We built iPhone Backup Extractor to be compatible with all of Apple's security measures, and we're committed to ensuring our product is used by legitimate, ethical users. Stay safe!